UnityのHDRPでSNNフィルタを実装する
最近UnityのHDRPを使って色々と実験をしている。今回はその実験中に作ったSNNフィルタポストプロセスの実装メモ。今回実装にはGtihubで公開されている「HDRP-Custom-Passes」に付属するシーンを使用した。

環境
Unity 2020.3.1f1 Personal
High Definition RP ver.10.3.2
SNNフィルタとは
SNNフィルタ(Symmetric Nearest Neighbor Filter)は、画像を油彩画のような見た目に変化させるフィルタである。中のアルゴリズムについては、既にわかりやすく説明されているサイトがあるので、ここでは省略する。
実装
PostProcessを管理するC#クラスを作成する
Create > Rendering > C# Post Process Volume からPostProcessを管理するC#クラスを作成する。ここでは「SNNFilter.cs」と名付けた。
SNNFilterクラスの中身は以下の通り。
using UnityEngine;
using UnityEngine.Rendering;
using UnityEngine.Rendering.HighDefinition;
using System;

[Serializable, VolumeComponentMenu("Post-processing/Custom/SNNFilter")]
public sealed class SNNFilter : CustomPostProcessVolumeComponent, IPostProcessComponent
{
    [Tooltip("Controls the intensity of the effect.")]
    public ClampedFloatParameter intensity = new ClampedFloatParameter(0f, 0f, 1f);
    public FloatParameter sampleCountFactor = new FloatParameter(2f);
    Material m_Material;

    public bool IsActive() => m_Material != null && intensity.value > 0f;

    // Do not forget to add this post process in the Custom Post Process Orders list (Project Settings > HDRP Default Settings).
    public override CustomPostProcessInjectionPoint injectionPoint => CustomPostProcessInjectionPoint.AfterPostProcess;

    const string kShaderName = "Hidden/Shader/SNNFilter";

    public override void Setup()
    {
        if (Shader.Find(kShaderName) != null)
            m_Material = new Material(Shader.Find(kShaderName));
        else
            Debug.LogError($"Unable to find shader '{kShaderName}'. Post Process Volume SNNFilter is unable to load.");
    }

    public override void Render(CommandBuffer cmd, HDCamera camera, RTHandle source, RTHandle destination)
    {
        if (m_Material == null)
            return;

        m_Material.SetFloat("_Intensity", intensity.value);
        m_Material.SetFloat("_SampleCountFactor", sampleCountFactor.value);

        m_Material.SetTexture("_InputTexture", source);
        HDUtils.DrawFullScreen(cmd, m_Material, destination);
    }

    public override void Cleanup()
    {
        CoreUtils.Destroy(m_Material);
    }
}
SNNFilterシェーダを作成する
Create > Shader > HDRP > PostProcess でポストプロセス用のシェーダを作成できる。ファイル名はSNNFilterとする。この時シェーダ名は先程作成したC#クラス中の kShaderName と完全に一致させる必要がある。
シェーダの中身は以下の通り。
Shader "Hidden/Shader/SNNFilter"
{
    HLSLINCLUDE

    #pragma target 4.5
    #pragma only_renderers d3d11 playstation xboxone vulkan metal switch

    #include "Packages/com.unity.render-pipelines.core/ShaderLibrary/Common.hlsl"
    #include "Packages/com.unity.render-pipelines.core/ShaderLibrary/Color.hlsl"
    #include "Packages/com.unity.render-pipelines.high-definition/Runtime/ShaderLibrary/ShaderVariables.hlsl"
    #include "Packages/com.unity.render-pipelines.high-definition/Runtime/PostProcessing/Shaders/FXAA.hlsl"
    #include "Packages/com.unity.render-pipelines.high-definition/Runtime/PostProcessing/Shaders/RTUpscale.hlsl"

    struct Attributes
    {
        uint vertexID : SV_VertexID;
        UNITY_VERTEX_INPUT_INSTANCE_ID
    };

    struct Varyings
    {
        float4 positionCS : SV_POSITION;
        float2 texcoord   : TEXCOORD0;
        UNITY_VERTEX_OUTPUT_STEREO
    };

    Varyings Vert(Attributes input)
    {
        Varyings output;
        UNITY_SETUP_INSTANCE_ID(input);
        UNITY_INITIALIZE_VERTEX_OUTPUT_STEREO(output);
        output.positionCS = GetFullScreenTriangleVertexPosition(input.vertexID);
        output.texcoord = GetFullScreenTriangleTexCoord(input.vertexID);
        return output;
    }

    // List of properties to control your post process effect
    float _Intensity;
    float _SampleCountFactor;
    TEXTURE2D_X(_InputTexture);

    float4 GetOffsetPixel(float2 offset, float2 coord) {
        float2 invScreenSize = 1.0 / _ScreenSize;
        float4 result = LOAD_TEXTURE2D_X(_InputTexture, (coord + invScreenSize * offset) * _ScreenSize.xy);
        return result;
    }

    float4 GetSNN(float4 centerColor, Varyings input, float2 offset) {
        float4 col0 = GetOffsetPixel(offset, input.texcoord);
        float4 col1 = GetOffsetPixel(-offset, input.texcoord);
        float3 d0 = col0.rgb - centerColor.rgb;
        float3 d1 = col1.rgb - centerColor.rgb;

        return dot(d0, d0) < dot(d1, d1) ? col0 : col1;
    }

    float4 CustomPostProcess(Varyings input) : SV_Target
    {
        UNITY_SETUP_STEREO_EYE_INDEX_POST_VERTEX(input);

        float4 centerColor = LOAD_TEXTURE2D_X(_InputTexture, input.texcoord * _ScreenSize.xy);

        int count = 0;
        float4 resultColor = (0, 0, 0, 1);
        for (int x = -_SampleCountFactor; x <= _SampleCountFactor; ++x) {
            for (int y = -_SampleCountFactor; y <= _SampleCountFactor; ++y) {
                if (x == 0 && y <= 0) {
                    continue;
                }
                resultColor += GetSNN(centerColor, input, float2(x, y));
                count++;
            }
        }
        resultColor /= count;

        return resultColor;
    }

    ENDHLSL

    SubShader
    {
        Pass
        {
            Name "SNNFIlter"

            ZWrite Off
            ZTest Always
            Blend Off
            Cull Off

            HLSLPROGRAM
                #pragma fragment CustomPostProcess
                #pragma vertex Vert
            ENDHLSL
        }
    }
    Fallback Off
}
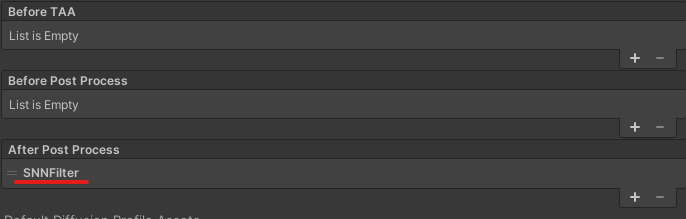
作成したポストプロセスをHDRPに登録する
Edit > ProjectSettings > HDRP Default Settings からHDRPの詳細な設定を決められる。今回は、 After Post Process に先程作成したSNNFilterを登録する。
ポストプロセスをシーンに追加する
Hierarchyから、 Volume > Global Volume と選択して、シーンにGlobal Volumeを追加する。Global Volumeはポストプロセスを設定すると、シーン全体にそのポストプロセスを適用することができる。
Global Volume中のVolumeコンポーネントのProfileのNewを押して、Profileを新規作成する。
続けて Add Override を選択する。ここまで適切に設定していれば、ここで「SNNFilter」を追加できる。Intensityを0より大きい値に設定するとポストプロセスが適用される。

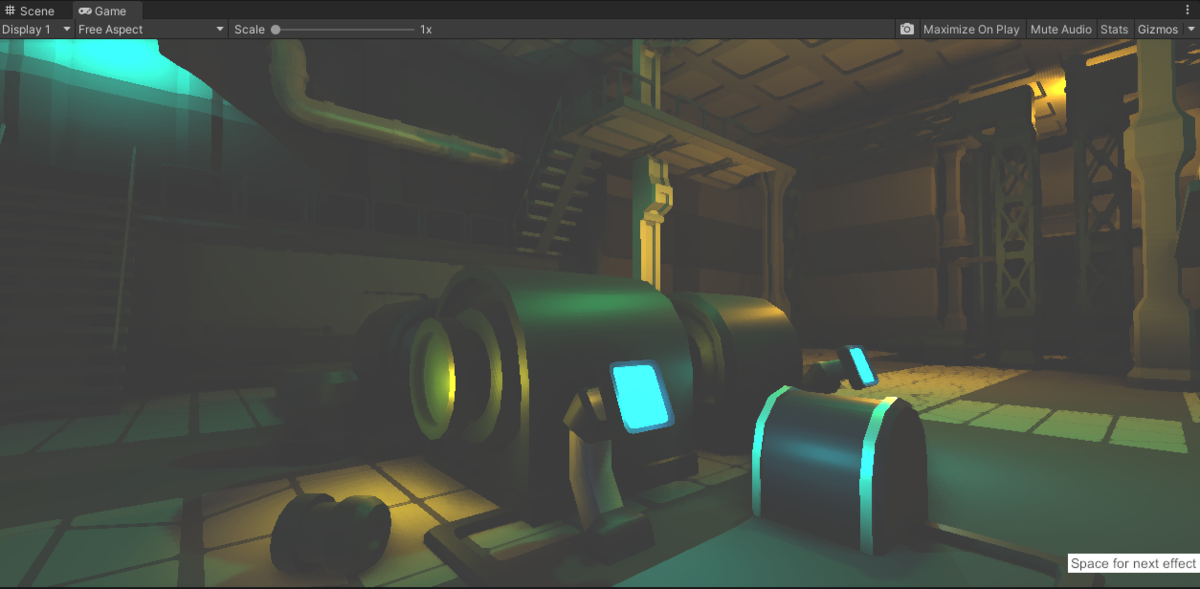
SNNFilterの例
Sample Count Factor = 2の時
Sample Count Factor = 10の時

Sample Count Factor = 20の時

参考資料
Custom Post Process | High Definition RP | 10.2.2
alelievr/HDRP-Custom-Passes: A bunch of custom passes made for HDRP